
The Stackwall Corners garden shed has been completed. Here are some new photos along with the original construction photos.
Beth Frew & Dennis Lapier took our one day, hands-on cordwood workshop in 2018 and by 2019 they had built this Garden Shed! When folks plan to build cordwood and then are successful, they love to share their success and suggestions.


Note the excellent random patterning of the cordwood in the walls. It takes a clear eye and a steady hand to keep a one-inch mortar joint throughout.


Below is how they made the wood cut-out frame for the door.


The first step, screw in the side pieces with 2×4 red cedar with 1″ recessed spacers.


Secure in the frame and fill it in.

The door is made of 3/4″ treated plywood with 1/2″ cedar on both sides.


Our Story as told by two rookies learning the cordwood process.
- When Beth and I thought about building our cordwood garden shed we didn’t realize just how much it entailed. To start out we liked the idea of stacked corners versus a beam corner look. They seemed to add a little extra esthetic look for the cordwood walls.
- We built the stacked corners with 1” spacers between each layer of 4×4’s, making sure each layer was plumb as we went. Then we proceeded with the post and beam part of the project.
- The post and beam part sure was a challenge. We purchased a truckload of 6×6’s from a demo project in Illinois last year. Learning how to lap joint 6” beams required an extra deep saw to cut the joints deep enough by cutting a series of saw cuts and then chiselling out the excess.
- We found a trailer load of 2×6 pine at an estate sale that we used for the purlins between the trusses which were made by the Amish. We hired the Amish to put the tin on the roof to save time. We also have no experience in tin roofing.
- After the tin was on we purchased red cedar log siding from an Amish sawmill in St. Louis, Missouri. Installing that on ladder jacks and a plank was a bit of a challenge as well but it sure turned out great.
- From that point, Beth and I proceeded to lay up cordwood. I, on one side and her on the other. We used Tom Hubers’ mortar recipe which consisted of 5 gallons of squeezed out cellulose insulation and 2 ½ gallons of masons sand, 2 gallons of cement and 2 gallons of lime. A very smelly mixture to work with but liked the idea of not having to cover anything after we were done for the night.
Well 6 weeks later, over 200 man-hours and 80 batches of mortar, working every night a few hours and 10-12 hour days on the weekends we finally got it done. Doors and windows to go on next spring.

Things we learned from this project
- When building the stacked corners we would assemble them ahead of time by using a jig and hoisting them in place with a crane then bolting them to the foundation to save time.
- We also learned how to mix mortar the hard way. Each batch was made in the wheelbarrow. We are purchasing a mortar mixer for the house project.
- Making sure we had plenty of wood pieces nearby to choose from saved a lot of time as well.
- Most of all the imperfections we created help add character to it all. It was well worth the effort we put into it.
- We will definitely need extra help on the house building.
- Taking your workshop last year was a Godsend because it gave us hands-on experience which proved invaluable.
- Also, thank you, Richard, for all your knowledge you lent us as we were progressing in the beginning.


We are looking forward to that journey of building our dream house in a way that will showcase our love and hard work for cord wooding. P.S. All our kids think we are nuts!! Dennis & Beth Laper


Check out the beautiful cordwood random patterning on the back wall. Great mixture of splits and rounds. Good use of a one-inch mortar joint. Very well done!


Building the stackwall corners ahead of time is a HUGE time saver.


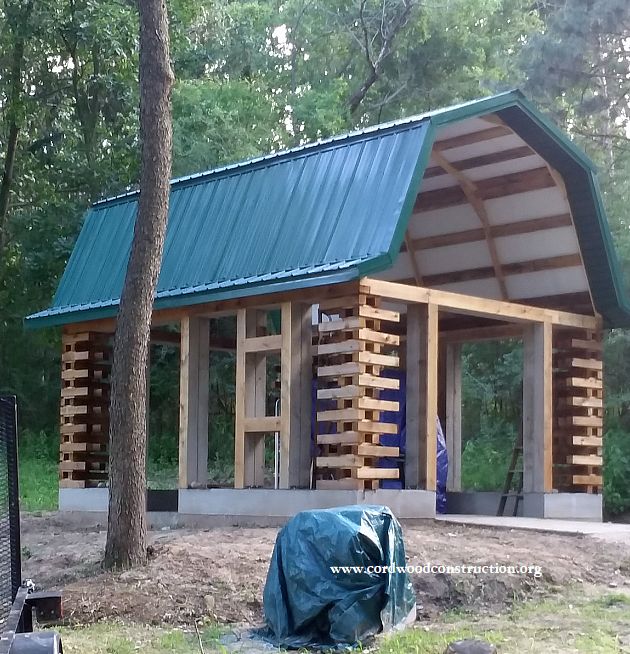
Grade beam foundation and solid, study post framing.
The frame is built, the roof attached and sheeted and work can begin!

- Watch where you put your hands while mortaring. The lime, after it dries, leaves a mark. Put duct tape or painters tape over the posts and/or wipe them down with a rag and water several times during a work session.
Should you wish to learn how to build a cordwood cottage, cabin or home, please visit www.cordwoodconstruction.org While you are there, click on the pictures, read the brief articles, check out the latest workshops and newsletter and if you are interested click on the Online Bookstore to see all the cordwood literature available in print and ebook format.
If you have questions that aren’t answered on the website you can email me at richardflatau@gmail.com
![]()
Readers have requested a brief bio, so here goes:
“Richard & Becky Flatau built their mortgage-free cordwood home in 1979 in Merrill, Wisconsin. Since then, they have written books, conducted workshops, facilitated the 2005, 2011 and 2015 Cordwood Conferences and provided consultation for cordwood builders. Cordwood Construction: Best Practices DVD, Cordwood Construction Best Practices (print) and Cordwood Conference Papers 2015 are the newest publications available from their online cordwood bookstore.” www.cordwoodconstruction.org

Here is a jpeg of the new Cordwood Construction DVD cover which is also available for immediate download at https://cordwoodconstruction.org/
The 30 part menu for the Cordwood Workshop DVD.


