Cordwood Flooring
“It’s not just for the walls, anymore…”
A neighbor of mine, Steve, called one cold January evening and said, “Richard, come on over and see my cordwood floor!” Needless to say, we hurried over and were amazed. ![]()
Steve is a mason by training and a general contractor by profession, so he has a knowledge and skill base that is both deep and wide. The hard maple (Acer saccharum) slices he used were 100 years old.
During the past year, three creative souls have sent me pictures and descriptions of their experiences with “laying” interior cordwood floors. There are, of course, commercial cordwood flooring options available, but most cordwood aficionados are looking to save money and come away with a building “statement” that “wows” and is attractive.
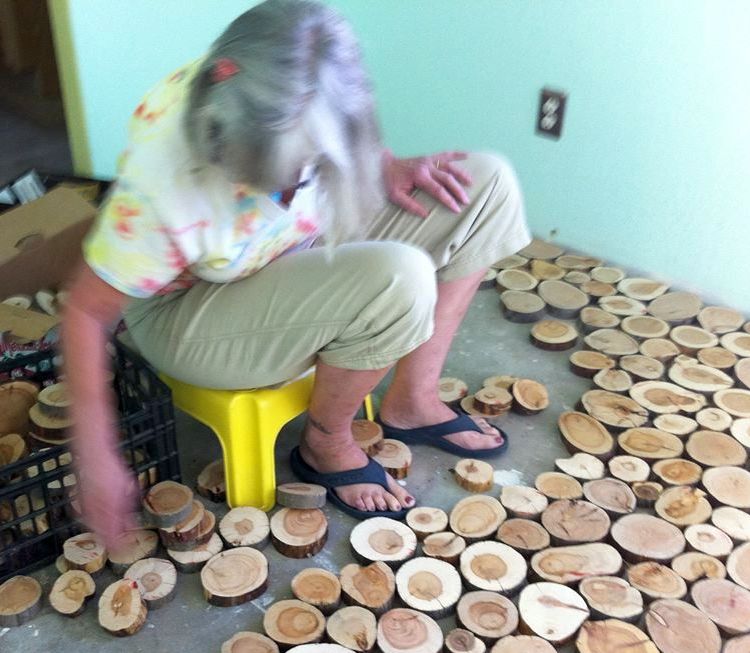
Sunny Pettis Lutz from Arizona was the next one to send photos and an explanation of her cordwood floor in Arizona. While Steve Lee’s flooring was fastened to a wooden sub-floor, Sunny’s was glued to a slab-on-grade.
![]()
Finally, Miroslav Bentley Kubala of the Czech Republic regaled me with photos of his beautiful cordwood storage garage complete with a cordwood floor. 
Herein follows a brief explanation of three cordwood floors with three different applications.
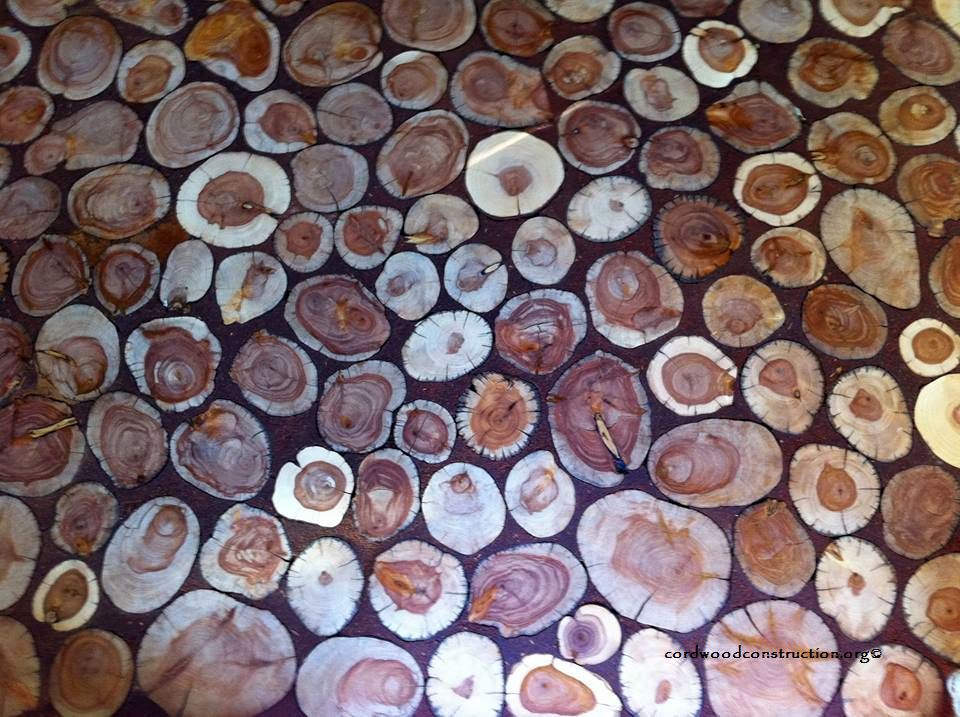
- Cordwood Floor: Steve Lee After finishing his remodeling project, Steve puzzled over what to do with the floor. He had many options in his construction skill set. Since J & J Lee Construction had poured the foundation at our cordwood home in 1979 and assisted in the addition of a dormer in 1992, Steve thought a cordwood floor might look good in their new, open-concept “great room.” Here the idea of a cordwood floor came to fruition.
While listening to the local radio station’s “Swap Shop” program, Sharon heard about the availability of a pick-up truck load of 100-year-old hardwood barn beams. Dry as a bone, leveled on two sides, of varying diameters, these, when sliced would become the mosaic pattern for the floor. Each eight-foot timber was cut to three feet and leveled on the ends. The log was then placed in a band saw and braced vertically. (Before cutting, these logs were checked with a metal detector, so any nails or screws could be removed.) Like slicing a loaf of bread, the logs were then sawn into 5/8″ pieces. In addition, all the sawdust was saved for eventual use in the tile-grouting mixture. The great room’s 600 sq. ft. sub floor was leveled and the cordwood slices were arranged to create a pattern. When orientation was resolved (flat side north and south, rounded edge east and west), the construction adhesive, purchased in one-gallon pails, was applied to a small section of the floor with a notched trowel. Steve suggests following the manufacturer’s instructions for applying the glue. Dealing with only a small portion at a time is important so the adhesive doesn’t “skin over”. The slices were firmly set and secured to the floor and the adhesive was allowed to dry for at least 24 hours. The next step was packing grout in the spaces between the log end slices. Steve used commercial tile grout mixed with the sawdust he had collected during the cutting process (the ratio was 80% tile grout to 20% sawdust.
After the grout had dried, an industrial sander was rented and coarse 24 grit sandpaper was used to clean the log faces. (Steve now suggests sealing the top faces of the cordwood BEFORE grouting, so that the log faces do not become coated with grout.) Steve sanded until he had a fairly level and smooth surface. A non-latex, commercial varnish sealer was applied with a lamb’s wool pad to achieve a smooth, level surface. Steve allowed the varnish sealer to set for 24 hours. Then he used a scuff pad between coats and reapplied more sealer until he achieved the surface he wanted.

Steve did the flooring at night and on weekends, but he projects that if someone could work full time on the floor while allowing ample time for drying of the glue and finish coats, it could be completed in one to two weeks. Sharon suggests letting the completed floor set for a week before replacing the furniture. When the furniture is returned to the room, place pads underneath of legs or pressure points to avoid damage to the final coat.
The floor creates a cozy and beautiful ambiance to the home which is filled with other wonderful examples of repurposing (cabinets, paneling, cedar ceiling, claw foot bathtub, etc.) and is a fine example of using surplus materials in a new way. These projects show the warmth of wood and the attraction of natural materials. The Lee cordwood floor provides an opportunity for creativity when using recycled wood in the home. One can only ponder the variations of cordwood flooring that could be produced using different patterning and cutting techniques. Visit https://cordwoodconstruction.org to learn more about cordwood flooring.
- Cordwood Floor: Sunny Pettis Lutz in Arizona

Sunny Pettis Lutz sent some photos of her gorgeous, hand-made cordwood floor. The following is a detailed list of how she and her husband, Tony, made their floor with legal pickings from the state forest. “Get a permit to go out to the forest and harvest dead trees. In our area, that means Juniper and Pine. On this floor, we are using Shaggy Bark Juniper and Alligator Bark Juniper.” Note that their flooring is on top of a cement slab.
 Here are their directions:
- Cut each piece with a chop saw set at 1 inch.
- Sort ‘disks’ for clean, useable slices.
- Remove any loose bark.
- Sand both sides using a belt sander
- Prepare concrete surface by sweeping and mopping clean.
- Begin to layout the disks on the floor getting them as close as possible. Work in 2′ sections.
- Glue the layout you like using Loctite PL Premium Construction Adhesive.
- Sand the glued discs, using a belt sander until everything is smooth and level.
- Use a shop-vac to cleanup all dust and debris.
- Apply a light coat of polyurethane to the surface of the disks (this is to prevent the grout from adhering to the tops).
- Grout the spaces with a mix of 80% grout & 20% sawdust.
- Apply 2-3 coats of polyurethane to finish.
- Cordwood Floor: Miroslav Bentley Kubala of the Czech Republic installed his cordwood flooring on a concrete slab using the same basic techniques as Steve Lee (see above).

Here are instructions from Miroslav:
- Clean the floor.
- Cut slices of wood (hardwood or a rot-resistant softwood) 3/4″ to 1 inch.
- Seal the top of the slices so they don’t get stained by the grout.
- Glue the slices to the floor
- Fill the gaps with grout
- Miro used a mortar/bentonite/acryl mixture
- Seal the floor with polyurethane
 And now for something completely different … A cordwood floor using reclaimed cypress by Matt Marwick of river recovered heart cypress precisionfloorcrafters.com
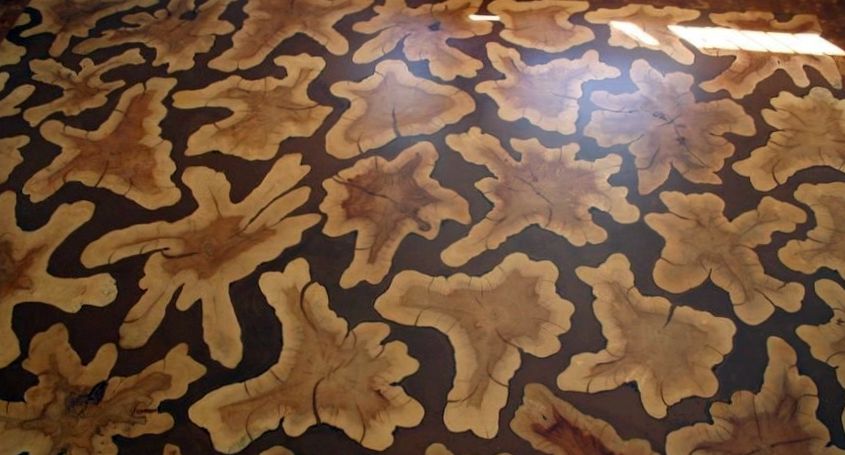
Note: Anyone wishing to try a DIY project like cordwood flooring is encouraged to study all the available literature and hone your skill set on a small “practice project.” The success of your venture, will be commensurate with the skills you have acquired and the quality of your construction. There are commercially available cordwood floor systems which can be examined through an internet search. Google “wood block flooring” and “end grain log flooring,” for starters. You’ll find manufacturers, DIY articles and videos. (Above) Matt Marwick also built this beautiful cordwood countertop.
(Above) Bill Jarratt, an excellent craftsman from Florida, built this bathroom countertop using cedar and epoxy. Check out his article on how to do this project. Click here.
Plus, for good measure, we have thrown in a cordwood garden pathway!
Finally, many folks have seen exterior cordwood garden paths and outdoor cordwood slices laid in the soil. This is a different animal than interior flooring. For outdoor cordwood paths, choose a rot-resistant wood (like cedar or cypress) and lay the cordwood slices – two inches thick or better – in a soil or sand base. Then tamp the wood pavers in place and smooth and stomp the soil/sand/aggregate, similar to how one would “lay” a brick or stone patio path.
Should you wish to learn how to build a cordwood cottage, cabin or home (in which to build your cordwood floor), please visit www.cordwoodconstruction.org While you are there, click on the pictures, read the brief articles, check out the latest workshops and newsletter and if you are interested click on the Online Bookstore to see all the cordwood literature available in print and ebook format.![]()
If you have questions that aren’t answered on the website you can email me at richardflatau@gmail.com
Readers have requested a brief bio, so here goes:
Richard & Becky Flatau built their mortgage-free cordwood home in 1979 in Merrill, Wisconsin. Since then, they have written books, conducted workshops, facilitated the 2005, 2011 and 2015 Cordwood Conferences and provided consultation for thousands of cordwood builders. Cordwood Construction: Best Practices DVD, Cordwood Construction Best Practices (print) and Cordwood Conference Papers 2015 are the newest publications available from their online cordwood bookstore. www.cordwoodconstruction.org
Here is a picture of the Cordwood Workshop Video cover. 
For more information on Cordwood Construction, click on the picture or visit www.cordwoodconstruction.org
![]()
![]()


