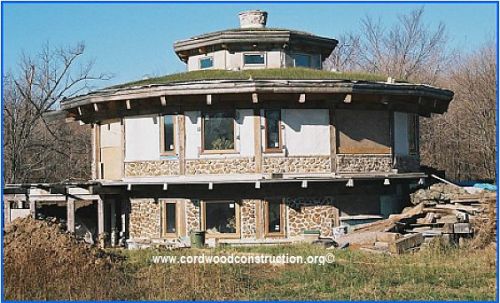
In Wiarton, Ontario there lives a wonderful hybrid/combination home consisting of double wall cordwood and strawbale/balewall. Rising three stories, 16 sided post and beam framed, living roof, masonry heater, rainscreen to wick moisture away, earth-bermed on the back of the first storey, large overhangs (44″), this house is quite a marvel. Peter used double wall cordwood and then topped that with strawbale with lime and clay plaster. Here are a few details. 
Exterior of home. Note the white areas on upper storey–they are plastered straw bales
Exterior view of bale-wood wall with a finished lime-plaster. Window does not have exterior trim yet. Note the drip edge flashing that goes from post to post above the window horizontally under the header beam. Also note the flashing with the drip edge at its top beside the deck boards.
Side View of a wall beside a sliding door. Note raw bale on one side of vertical wiring chase and earth-plastered bale and cordwood on the other.
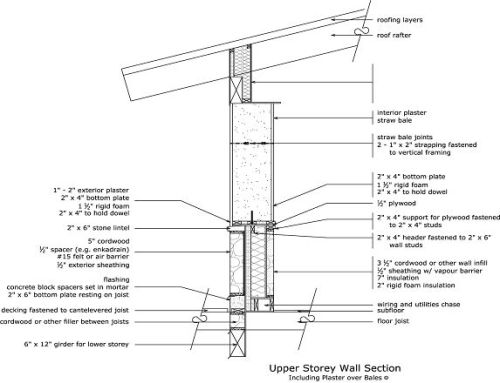
Double wall Cordwood with Straw Bale on top and a Rain-Screen to deal with moisture and prevent mold.
In Peter’s words: “If you choose the double-walled approach, you may want to incorporate a rain screen. In the magazine Fine Homebuilding, issue #162, renowned building science writer Joseph Listurbek reveals in one word—literally—the reasons behind constructing a cavity behind any exterior masonry wall. That word is “mold.” If you want to be sure to avoid its occurrence and growth, you should incorporate a rain-screen function. Given that the exterior layer of a double cordwood wall is very similar to a brick façade on any other building, I surmised that constructing such a layer would please any code official. One can debate the necessity of such a feature, but it’s a proven technique in quality conventional construction. (below) see Fine Homebuilding issues #142 & #137.
Aesthetics: Cordwood, with its heavy texture, paired with smoothly plastered bales looks balanced and beautiful. It’s reminiscent of traditional houses in the Alps.
Heating Response Time: With huge mass in our house in the form of a masonry chimney and our downstairs cordwood walls, I began to hugely, massively worry about how long it would take to heat up our house should we be away from it for more than a weekend. The house already takes a long time to heat up; if our upstairs walls were cordwood instead of bales, the temperature would take even longer to respond to heating input. The thermal mass of cordwood is indeed a good thing, but we should use almost any material in moderation. Bale enthusiasts stress the high degree of thermal mass in a plastered bale wall, but it still has less mass in it than cordwood as I will try to show below.
Harvesting vs. Lumbering: The production of bales uses relatively little energy considering that they are a byproduct of a separate harvesting process. As such, the only energy used to procure them comes from hauling them from farmer’s field to building site. In comparison, the actual cordwood in a cordwood wall may be comparable in terms of energy input only in an ideal scenario. All of our cordwood was already felled and came from auctions, old fences, or log home cut-offs. But when you start to factor in the cutting down of living trees to provide your wood supply, not to mention all of the human-related energy expended in stripping bark, cutting wood to length and splitting it, the scales begin to tip towards bales. As far as I can see, the only fly in the soup occurs if your bale material was grown with a lot of pesticides and your cordwood hasn’t been treated, nor will it ever be.
Plaster vs. Mortar: Cordwood mortar joints come not only after a lot of human energy has been expended but also after a lot of non-renewable fuel has been depleted to manufacture the cement and lime in the mortar. I could’ve used energy-friendly cob or papercrete mortar around our cordwood, but the long-term viability of those techniques hadn’t been proven when we built and in this case, I wasn’t willing to be a pioneer.
The volume of mortar in a cordwood wall versus plaster on a bale wall is the main, but not only, factor in this comparison. Let’s assume the worst eco-combo: a cement-based plaster and a cement-based cordwood mortar. By my back-of-the-napkin calculations, a 2” thick (max.) bale wall plaster has 1/4 – 1/3 less volume than a cordwood wall 4” thick. And that’s only by volume, not weight. We actually used a natural plaster on our bales which is less dense (therefore has less mass and less fuel input) than a cement plaster or a masonry mortar. Our natural plaster was comprised of lime and easily-gathered, locally occurring clay, sand, and straw. The amount of lime we used was small because we only used it on our thin finishing coat of plaster on the exterior. It was less lime than we used to critter-proof sawdust insulation in a classic single cordwood wall in one of our sheds.
Putting The Ingredients Together
Our own bale and cordwood assembly was complex. We built our double wall with a rain-screen feature as mentioned. Then we topped the wall at the desired level with a two-by-four “top plate” on the inside and 2” thick stone lintels on the outside. I used ½” plywood to span these. To keep the bottom of the bales dry and to provide a zone of thermal separation between the plywood and the bales, we put 1-½” thick rigid foam on top of the plywood. At regular intervals amongst the foam, you could screw down scraps of 2 X 4” lumber into which you would insert dowels 4-8” long. You skewer the bales on top of these to keep them within the plane of the wall. (We omitted this step, but our bale walls are only 54” tall and are pinned in other ways–see below). On top of this foam layer, we sprinkled powdered borax to discourage critters and any cows who have a taste for dry, plastered bales. Next, we placed a row of bales placed on their vertical ends. Stretching across the bales from one side of the wall to the other is 1” x 2” strapping which is screwed to the framing. This compresses the bales downwards and keeps them anchored to the plywood platform beneath. We aligned the bales vertically only because this allowed the best fit within our wall space. We drove sticks, scrap strapping, and dowels through each of these bales to pin them horizontally to their neighbours. On top of this row, we wedged a horizontally aligned row of bales under the top girder (plate) of our walls. Then we plastered from the bottom plywood plate up to the girder on the interior and exterior wall faces. Desserts often taste nice when they’re moist; bales do also when cows eat them. However, to avoid having ruminants nibbling at your walls and to ensure longevity, you must keep bales in a wall quite dry. For this reason, we created large 44” roof overhangs and a 36” high cordwood wall base underneath our bales which naturally absorbs the bulk of rain-driven moisture. The big issue is in determining how best to lay up the bales on top of the cordwood. For those with simpler tastes who are utilizing a classic single cordwood wall, it would not be very complicated. Lay boards across the top of your fresh cordwood mortar, one board flat on the exterior face, one on the interior. Top them with a piece of plywood laid flat and stretching across the cordwood wall from interior to exterior. Top this with your bales and detail this junction carefully. Build the bales up to the top plate or beam of your wall, and then plaster over them.
This wall may sound somewhat simple to some people, but the devil lurks in the details. After finally figuring out the framing, it took one big work party, several smaller ones and several weeks passing before our cordwood cake was frosted with pleasingly plastered bales.”
These words of wisdom are excerpts from Peter’s article in the Cordwood Conference Papers 2005, available in print, CD or ebook version by visiting www.cordwoodconstruction.org and going to the online Bookstore.


