
Dan & Kristen wanted a sauna on their 80 wooded acres in northern Wisconsin. They had previously hosted a very successful workshop at the 2005 Cordwood Conference which resulted in the construction of a beautiful cordwood maple syrup shed. They also wanted to have their teenage sons participate in the process, they decided on a grade beam for economy and ease of building. A grade beam is simply a shallow, perimeter poured slab which rests on a rubble trench foundation. In the trades, it is called a Frost Protected Shallow Foundation (FPSF) and is insulated on the bottom and sides.
 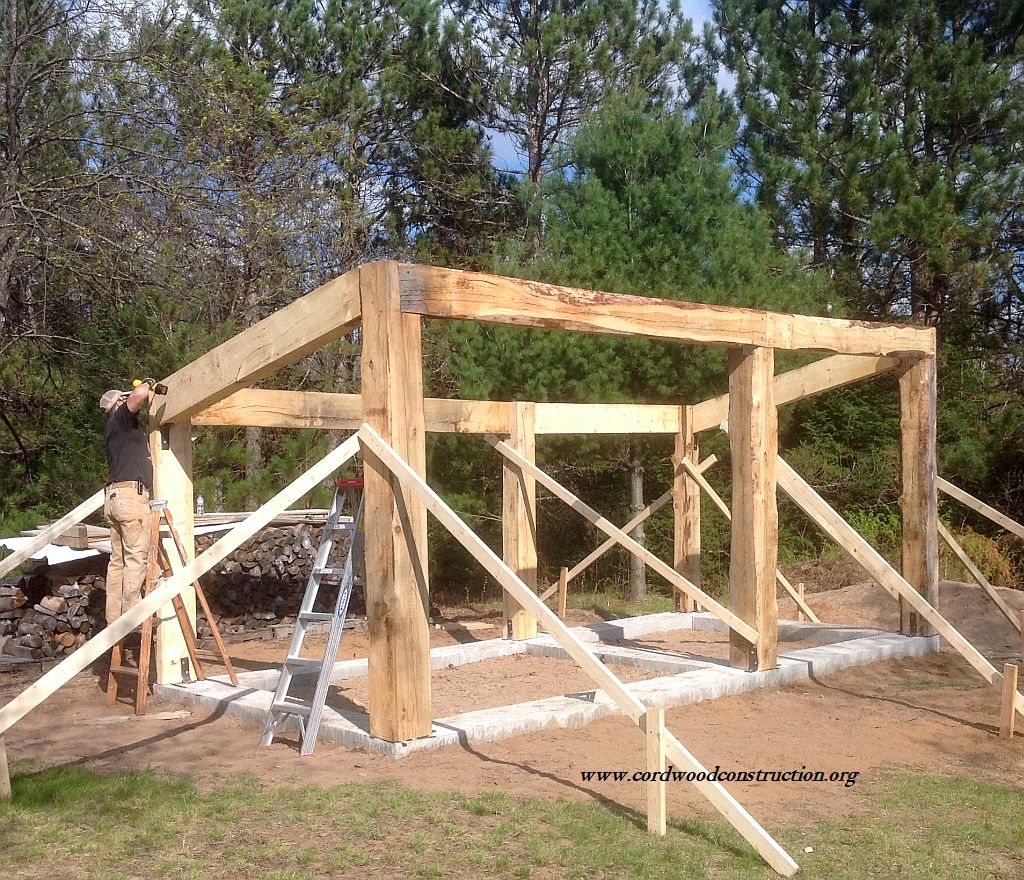 The posts are anchored to the grade beam using angle iron and wedge anchors or anchor bolts. All the posts were cut at a local sawmill.
  It is important to cross brace the framework. The roof was built before the cordwood infill commenced.
 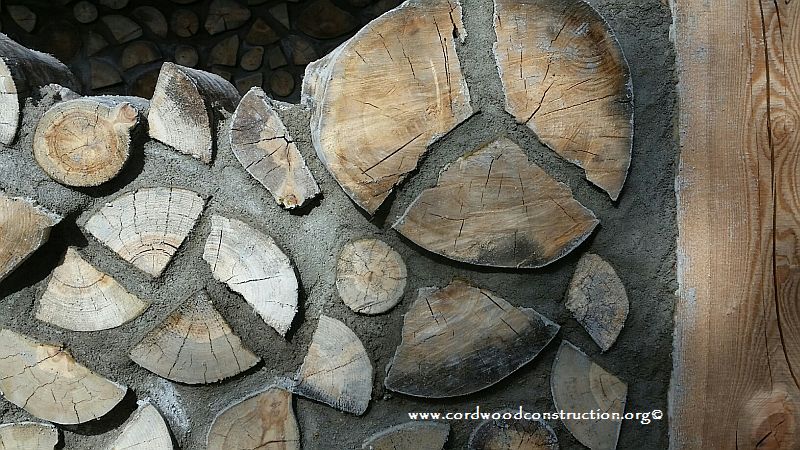 Before the workshop portions of the walls built with the family for practice.
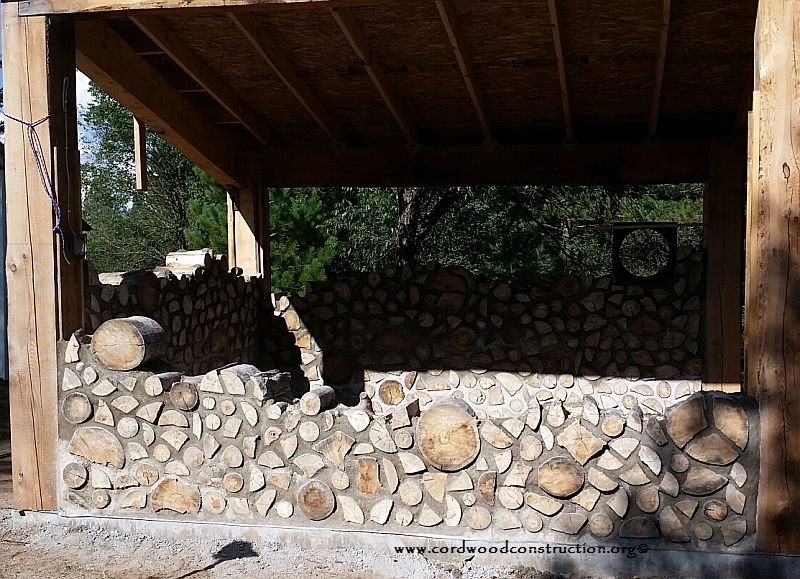
(Below) This is how you work should look at the end of the day. The gums are set and the teeth are sticking out. No mortar on the top of a log at days end.
 On the top right-hand side an “exploded log” has been split and then placed in the mortar matrix to regain its round shape. This is done to eliminate log shrinkage.
  We had an August workshop with a delightful and studious group of cordwooders from all over the country.
  A cardboard template for bottle end designs works very well.
 The finished Ojibwe-inspired Medicine Wheel.
The Novitch’s are very happy with their new sauna!![]()
![]() A butterfly checks it out!
A butterfly checks it out!![]()
![]()
![]() Exploded large pieces look very good in a wall.
Exploded large pieces look very good in a wall. ![]()
![]()
![]()
Cordwood Lessons by Dan Novitch
Cordwood Points gleaned from two cordwood projects: a cordwood pole shed built on a ladder pad foundation and a post-and-beam framed cordwood sauna built on a grade beam/ring beam foundation) completed 11 years apart:
* Tuckpointing – we used table knives to tuckpoint the mortar on our first building and teaspoons followed by a wet paintbrush on the second building. The spoon, brush technique was quicker and resulted in a smoother finish.
* First building used treated lumber for the frame of the ladder pad and the poles. The second building used posts and beams from trees cut on-site and milled on-site with a portable bandsaw mill. Use as much site sourced or locally sourced building material as possible.
*. Both buildings used coarse sawdust for insulation and when soaked, as a set retardant in the mortar. Really liked this due to low cost, local material, and completely “green” building material. Plus, any leftover sawdust is great for composting or as mulch.
* Ladder pad foundation from the first building is on a well-drained, sandy soil site. After 11 years and 11 Wisconsin winters, the building has NOT moved a bit. I wouldn’t hesitate to use a similar foundation in the future for a shed or similar outbuilding.
* The second building is on a grade beam foundation. I was originally going to build it on a floating slab until a grade beam foundation was suggested. I think the grade beam is definitely the way to go. In addition to greatly reducing the amount of and cost for concrete, it allows for a plethora of really cool flooring options.
* First building was built when our sons were 5 and 3 years old. For the second building, they were 16 and 14. Besides being a great help as laborers and mortar mixers, they learned how to run a sawmill, do post and beam construction methods, use cordwood masonry skills, etc. In the future, if they choose, their parents could be laborers for their own cordwood building dream.
* For anything but a very small project, use a mortar mixer or modified cement mixer. It will speed the project and reduce physical fatigue. Definitely, mix your first batches of mortar in a wheelbarrow or mortar boat, though. That is the best way to truly get to know and understand the mortar.
* For the first project, all log ends over 6-7 inches in diameter were split and air-dried for 15 months before building began. However, in looking at other cordwood buildings over the intervening 11 years, I found that I liked the look of at least a few large, true rounds in each wall. So for the second project, we used both “exploded” rounds and kiln-dried true rounds in each wall along with smaller diameter rounds and various split log ends. At three months post cordwooding, the exploded rounds haven’t changed or moved a bit. For the largest kiln-dried true rounds, some 12-16 inches in diameter, there is a 2-3mm gap between the mortar and the log ends due to further shrinkage/drying of these really large rounds with time. I still like the look of the larger rounds but it looks like permachink will be needed in the future. The kiln-dried rounds up to 8-10″ diameter have not shrunk to this point, but I’ll keep my eye on them over the coming months and cold, dry winter.
* Bottle end designs are really cool.
* My wife is not only a wonderful, beautiful partner in this voyage known as life, she is a patient, forgiving building partner who knows all my shortcomings, but loves me anyway.
* The 94# bags of Portland cement weigh more now than they did 11 years ago!
A cardboard template for bottle end designs work very well.
* We used different mortar mixes for each building. I liked the second building’s mix a bit better, but both worked fine. If you plan to do a small “learning” cordwood building before undertaking a larger house or cabin project, consider trying different mortar mixes on different walls of the learner project to see which type of mortar you like best.
Should you wish to learn how to build a cordwood cottage, cabin or home, please visit www.cordwoodconstruction.org While you are there, click on the pictures, read the brief articles, check out the latest workshops and newsletter and if you are interested click on the Online Bookstore to see all the cordwood literature available in print and ebook format.![]() If you have questions that aren’t answered on the website you can email me at richardflatau@gmail.com
If you have questions that aren’t answered on the website you can email me at richardflatau@gmail.com
Readers have requested a brief bio, so here goes:
Richard & Becky Flatau built their mortgage-free cordwood home in 1979 in Merrill, Wisconsin. Since then, they have written books, conducted workshops, facilitated the 2005, 2011 and 2015 Cordwood Conferences and provided consultation for cordwood builders. Cordwood Construction: Best Practices DVD, Cordwood Construction Best Practices (print) and Cordwood Conference Papers 2015 are the newest publications available from their online cordwood bookstore. www.cordwoodconstruction.org

For more information on Cordwood Construction, click on the picture or visit www.cordwoodconstruction.org


