
Sunny Pettis Lutz sent new photos of her much-envied cordwood floor in Arizona. Sunny’s pictures have traveled to all corners of the globe in blogs, website and social media. She and her husband Tony have delighted in the well deserved fanfare and compliments. Here are the new photos. Thank you Sunny!
 Sunny mentioned, “In the original pics, the kitchen walls were yellow and the cabinets were hickory. Well, the hickory stripes really clashed with the juniper disk floor, so we painted the cabinets yellow and the walls red. I like it MUCH better!”


The posts really look attractive with the cordwood flooring. 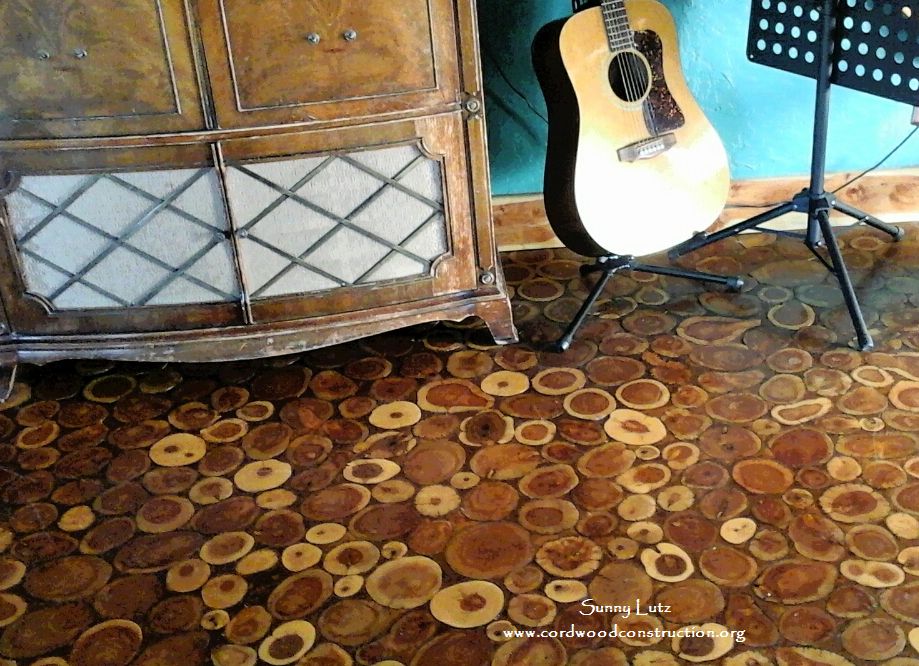


The original photos of the construction of the floor show Sunny and Tony putting the hickory slices in place like you would a jig saw puzzle.
Below is the original article so you can see what started the whole cordwood flooring inspiration.
Sunny Pettis Lutz send some photos of her gorgeous, hand-made cordwood floor. The following is a detailed list of how they made their floor with legal pickings from the state forest. “Go out to the forest and harvest dead trees. In our area that means Juniper and Pine. We are using Shaggy Bark Juniper and Alligator Bark Juniper.”
 Sunny is laying out the hardwood discs.
 Run each piece through the chop saw set at 1″. Tony is gluing the slices in place.
Prepare surface by sweeping and mopping clean. We are gluing directly onto our concreet slab. Sand both sides using a belt sander.Begin to layout disks on the floor. Try to get them as close as possible. Work in 2′ sections.
 Glue the pieces down and firmly tamp them. We’re using Loctite PL Premium Construction Adhesive.
 Apply a light coat of polyurethane to the surface of the disks (this is to prevent the grout from adhering to the tops).
Grout the spaces between the slices with a mix of 80% tile grout, 20% sawdust. Your local flooring store will have many options.
Apply 2-3 coats of polyurethane to finish.

Here is a detailed list of how Sunny and her husband Tony made this beautiful cordwood floor!
Cordwood Flooring Instructions by Sunny & Tony.
- If you don’t have wood you can access on your property, then go to your local Forest Service office or ranger station and buy a wood harvesting permit.
- Pack your pick-up truck with gloves, chainsaw(s), ax, come along and other tools as necessary.
- Go out to the forest and harvest dead trees. In our area (Arizona) that means Juniper and Pine. Pine and Juniper can be taken while standing. We are using Shaggy Bark Juniper and Alligator Bark Juniper.
- Look for wood close to the road on the uphill side. No one wants to be dragging these logs from the down-slope side.
- Cut down the dead wood using tools from step 2.
- Attach Forest permit to wood and take it home.
- Sort what will be lumber and what is just good for firewood.
- Cut logs into a manageable size.
- Run each piece through the chop saw set at 1″.
- Sort ‘disks’ for usable ones vs bad ones.
- Remove any loose bark either by hand using a chisel or scraper.
- Prepare the floor surface by sweeping and mopping. We are gluing the slices directly onto our concrete slab.
- Sand both sides using a belt sander.
- Begin to layout disks on the floor. Try to get them as close as possible. Work in 2′ sections.
- Glue the layout you have chosen. We’re using Loctite PL Premium Construction Adhesive.
- Repeat.
- Sand using a belt sander until everything is smooth and level.
- Use shop-vac to clean up all dust and debris.
- Apply a light coat of polyurethane to the surface of the disks. (this is to prevent the grout from adhering to the faces).
- Grout the spaces with a mix of 80% tile grout, 20% sawdust.
- Apply 2-3 coats of polyurethane to finish.
More pictures of Sunny & Tony’s floor.
![]()
Should you wish to learn how to build a cordwood floor, cottage, cabin or home, please visit www.cordwoodconstruction.org While you are there, click on the pictures, read the brief articles, check out the latest workshops and newsletter and if you are interested click on the Online Bookstore to see all the cordwood literature available in print and ebook format.
![]()
Readers have requested a brief bio, so here goes:
“Richard & Becky Flatau built their mortgage-free cordwood home in 1979 in Merrill, Wisconsin. Since then, they have written books, conducted workshops, facilitated the 2005, 2011 and 2015 Cordwood Conferences and provided consultation for cordwood builders. Cordwood Construction: Best Practices and Cordwood Conference Papers 2015 are the newest publications available from their online cordwood bookstore. www.cordwoodconstruction.org


