
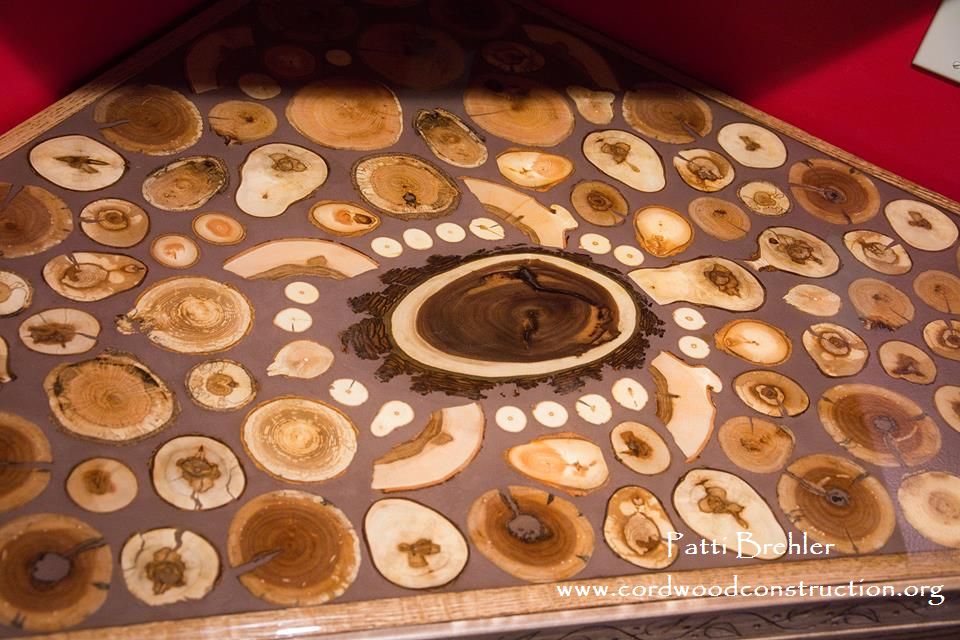
Patti Brehler from near Roscommon, Michigan sent these gorgeous photos of the cordwood top she made on top of her husband’s corner cabinet. You will notice a walnut turtle in the center. How creative and delightful! Thank you Patti for sharing your creation. I love these shares. Patti is the editor at the “Voice of the Ausable.”
Here are Patti’s directions on how to build one for yourself! We bought your book several years ago after moving to northeastern Michigan from the Detroit area. I was interested in building a cordwood writing studio at the back of our 13 acres of hardwood forest, that butts up against a state recreation area. After figuring out how much work this meant, we kind of gave up the idea. But, I still had the itch to do some cordwood! My husband, Andy, is a nice woodworker. I’ve always wanted him to build me a corner cabinet in the kitchen as a “beverage” counter, with a lower drawer to house the dog dishes, and doors to put the dog food containers in. Well, he finally got around to it in 2015.

The first step, he builds the wine rack at the top, then started on the bottom cabinet. He made a triangle template for me to make the cordwood design for the countertop. That was my job! I knew I wanted the center piece to be a slice of walnut from David Miller’s Sawmill in Mio, MI. The other pieces I pulled from our woodshed – ash, birch, maple and oak. Andy built a jig for his bandsaw so I could slice the wood pieces the same – 3/4″. I made my design on the template and the turtle just sort of came to life on it’s own. We did a few things to experiment with. First, Andy glued a test piece on a board to see if just the glue would be enough to hold the wood slice on for sanding. That worked just fine. We decided on the dark grout and I went to work glueing the pieces to the countertop. Andy did an initial sanding and coated them with polyurethane to protect them from the grout. After grouting, he sanded again to clean them up and added another coat of polyurethane. We learned how to pour the epoxy on the lazy susan, so felt confident when we did the counter top. We did three pours on the countertop. The first pour was to seal and did not result in a flat surface. The second pour made it flat, but we made a mistake by adding “dams” at the edges. We weren’t sure about letting the epoxy run over the edges because we knew we wanted to add the decorative piece on the front edge. But, it was evident that we needed a third pour to let run over the edge for a more finished look. We’re very happy with the results! Here’s the photo of the lazy susan, which is a nice compliment to the cabinet.

Here is the 15 1/2″ octagon Lazy Susan we built as a practice piece, so I could try out grout colors, and we could test the epoxy pour.

Should you wish to learn how to build a cordwood cottage, cabin or home, please visit www.cordwoodconstruction.org While you are there, click on the pictures, read the brief articles, check out the latest workshops and newsletter and if you are interested click on the Online Bookstore to see all the cordwood literature available in print and ebook format.![]() If you have questions that aren’t answered on the website you can email me at richardflatau@gmail.com
If you have questions that aren’t answered on the website you can email me at richardflatau@gmail.com
Readers have requested a brief bio, so here goes:
“Richard & Becky Flatau built their mortgage-free cordwood home in 1979 in Merrill, Wisconsin. Since then, they have written books, conducted workshops, facilitated the 2005, 2011 and 2015 Cordwood Conferences and provided consultation for cordwood builders. Cordwood Construction: Best Practices and Cordwood Conference Papers 2015 are the newest publications available from their online cordwood bookstore. www.cordwoodconstruction.org


